Saturday, February 28, 2009

VistaPrint is having a huge sale on invites and other stationary! They have great party invites and some very tempting save the dates (STD's... hehehe, there are lots of funny acronyms in the wedding world) that I would use in a second! I'm pretty sure when we get around to make our STD's that I'll use VistaPrint. This sale I could get 100 STD's for 46.00 with all the info printed. And we could use a picture of ourselves that would be printed in color as well! Exciting! Now I just need to choose a date... F and I are supposed to be sitting down and doing some major decision making this weekend, I'll keep you all posted.

And just so this isn't a completely word filled post...

The snowman F and I made with the first snow of the year. We had some more last friday, but here's hoping that it was the last.

Monday, February 16, 2009

Real wedding

I have so many things I want to blog about (the zoo, the movie I went to see this weekend, bridal jealousy) but I'm exhausted from my first day back to work, so those are going to wait. Until I can post for real, here is an adorable wedding from Style Me Pretty

I love these colors! So bright and pretty!

"Mary and Justin knew that they wanted the focus of their wedding celebration to be on family and friends … so there could be no better place than Mary’s parent’s backyard."

"Mary and Justin knew that their family would love a candy buffet, so the centerpieces and other floral design incorporated bright candy-colors into the overall style."

“ 'Style Me A Pretty Wedding' … yep … I think Mary, Cindy & Signature Events did!"

"Photographs provided by Signature Events. A huge thanks to Amy for sending us Mary & Justin’s delightful celebration!

Vendor Credits: Photography by Wendy Cahill; Floral Design by D. McLeod; Catering by Red Blazer

© Style Me Pretty : The Ultimate Wedding Blog, 2009."

Friday, February 13, 2009

DIY Valentines

Ok, so it's a little late, but here is the post I've been talking about! I decided to make valentines for my whole family because it's the first Valentines Day I'll spend with my family in a couple of years. So I was thinking, what is a cheap something that I can make, but still cute, easy and fun?

DIY Recycled paper bag valentines
Supplies:
1 Brown grocery bag (I used one normal sized bag and got 5 valentines bags)
Scraps of fabric
1 dvd (I found the ones with the square cover best since they are really square)
pencil
Sewing machine and brightly colored thread
Needle
Candy (I'm using some I already had, but I also bought some more to fill it out a little more... that was the only thing I had to buy for this project, so the total cost of the project was around $3.00 and a couple hours of time)

Step 1: Cut open grocery bag and lay flat on hard surface.Then trace DVD cover. Next I free handed the angled edges at the bottom (these are showing on the top, but imagine them flipped around) to create an envelope effect. Not necessary, but I liked it better. You can freehand this because you can just trim them to match later on.
I used my copy of Harry Potter and the Chamber of Secrets to trace.
Step 2: Pick out the fabric or design you want on the outside of the bag and pin it on. Make sure it's where you want it though because the pin marks show if you move it around. In this case, I cut a heart out of fun fabric for my brother.
Step 3: Sew design on using your regular sewing machine. Be careful not to go to fast or pull too hard as it will tear the paper.

Step 4: Lay two pieces together with the rough sides out (the sides that will be on the inside) and sew the angled parts of the bottom together.
I also folded along the pencil mark from the DVD tracing so that when I did the next step it was a cleaner fold.
Step 5: Fold two pieces at line down and away from each other until those two pieces that were just on the outside are now on the inside and your pretty design is on the outside.

Step 6: Sew straight-edges up each side. I chose a bright color that matches the bright fabric.
Step 7: I added straps so I can hang them on their doors the night before, so they can have them first thing in the morning! I used scraps that I already had. If I could change how I did this for next time, if I'm adding straps I would have done it before I sewed the two pieces together. Because after I sewed them together, I couldn't use the sewing machine, so I had to sew them together by hand which was the most time-consuming part of the whole project.

And voila! Easy, cute and cheap (cheap cheap!).

This one is for my older bro.

This one is for my little bro.
For my mom (painted with pink acrylic paint before sewing)
And for my dad (painted with white acrylic paint, and the red is made from a red paper napkin)

All my cuties all together.
This was such an easy, cheap project that I'm almost considering making them again for my favors. Can you imagine a candy buffet with these to put the candy in? And it would only cost me time and energy because I have so much scrap fabric that could be used and they could all be different and I could even maybe get a monogram stamp to put on them too! Love it :)


In other news, here are my anniversary roses almost three weeks later. I think there is something really elegant about dying roses. I've saved so many of the flowers I've received in my life (I dried the roses Evan gave me on our first date and still have them).


And in even other news.... My kitten boy thinks he is a man and has to control the remote. So cute :D
And now I've off to fill up my valentines bags and finishing F's other valentines projects which I will show later. We are going to the zoo tomorrow and I'm sure I will have pictures of that to share soon too.

Have a wonderful Valentines Day!

Thursday, February 12, 2009

Um, how cute is this?

I will have my DIY valentines stuff up later tonight, but until then... check out this adorable idea for a valentine! Who doesn't love a mixtape?

Mixtape Card Tutorial

mixtape card

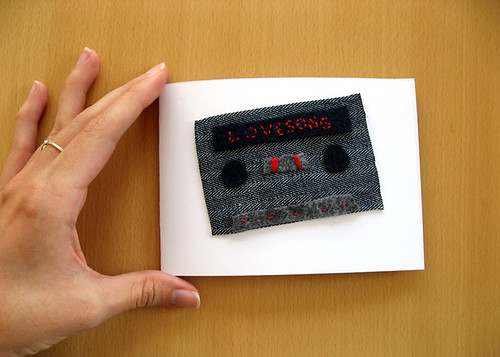
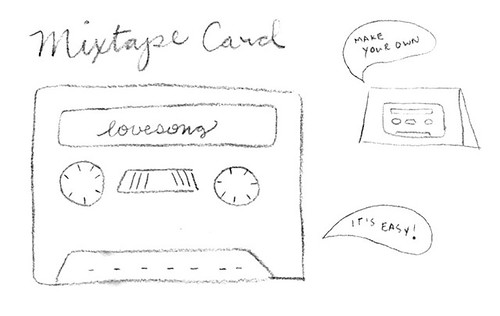
This card is so easy to make it hardly even needs a tutorial, but I thought it would be fun to put together anyway. And I wanted to show off my amazing graphics and photoshop skills (yeah, right). This card makes a perfect handmade Valentine if you embroider something sweet on the label, or the title of your favorite lovesong... Don't want to sew? Use fabric glue! Don't have fabric? Use paper and glue instead!
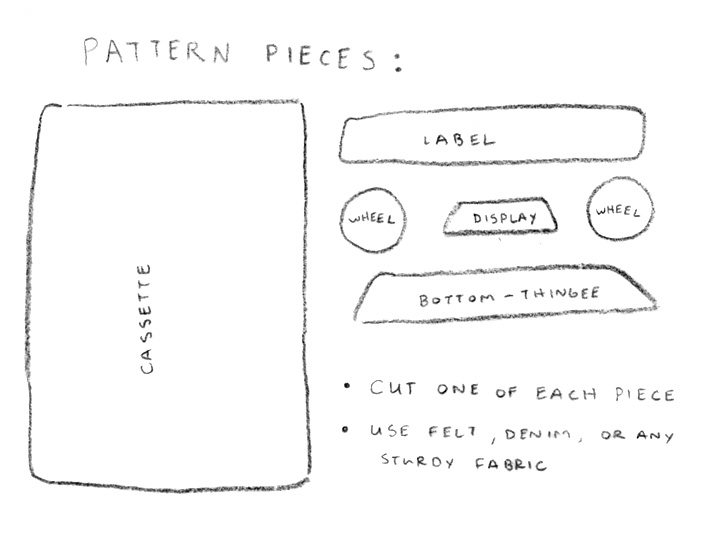


Without further ado, let's get started!

You'll need:

  • 8 1/2 x 11 sheet cardstock

  • felt, denim, or any sturdy fabric

  • embroidery floss

  • scissors

  • needle

  • pen or chalk pencil (for dark fabric)

  • Optional:
  • fabric glue (for a no-sew version!)

  • fray check (to prevent raggy edges)


Make the Card

  1. Click to get larger size, and print the pattern:

  2. Cut the pattern pieces: use sharp scissors to keep those edges tidy!


  3. Using a pen or chalk pencil, write a lovesong or romantic phrase on the label. Simple block letters are easiest.


  4. Embroider the label.


  5. Sew pieces together using a blanket stitch or straight stitch.
    No-sew version: Glue the pieces together with fabric glue.


  6. Optional: If using denim or other fabric, treat raw edges with fray check to keep them from fraying. I didn't use fray check on my card because I like ragged edges!


  7. Fold the 8 1/2 x 11 cardstock in half for a large card. For a smaller card, fold one more time.


  8. Sew the finished cassette to card using blanket stitch or straight stitch.
    No-sew version: Glue the cassette to the card using fabric glue.


  9. Say something nice and memorable on the inside of your Valentine!


Voila! You just made a mixtape card. I could churn out a bajillion of these, I think they're so cute. And so much less goopy than your average card bedecked with pink hearts and so forth.


Feel free to use this pattern however you please - alter it, leave out stuff, and adapt to your heart's content.

Monday, February 9, 2009

Love this! It would be so easy to replicate!

Making Candles in Tins

Tea tins are ideal for making these simple but effective container candles. However, you can also use olive oil jugs, sardine cans, or any other tin imaginable to make beautiful and colorful displays!


Supplies:

Four 6-inch-length wire-core wicks, primed

4 wick holders

4 tin cans, approximately 4 inches deep and 2 inches wide

2.5 ounces stearin

1 disk wax dye, if desired

1.5 pounds paraffin wax


Directions:
1. Insert a length of primed wick into each wick holder and place a wick in the center of each tin.

2. In the top of a double boiler over medium heat, melt the stearin and wax dye, if using.

3. Add the wax. Melt and mix thoroughly. Heat to 190 degrees Fahrenheit.

4. Anchor the wicks in the tins by pouring enough wax into each tin to cover about 1/2 inch of each wick. Allow the wax to cool for about 30 minutes.

5. Wrap the end of the wicks around tie rods and rest the rods on the tops of the containers. Take up any slack in the wicks and center them within the tins. Be careful not to dislodge the anchors.

6. Reheat the wax to 190 degrees Fahrenheit and fill the tins to within 1/2 inch of the top. Allow to cool for one hour.

7. If the wax settles, reheat the remaining wax to 190 degrees Fahrenheit and top off the candles as necessary.

8. Cool for several hours or overnight. Remove the tie rods, trim the wicks to 1/4 inch, and the candles are ready to light.

This project originally appeared in the book Country Living Homemade Candles.


I'm going to start collecting tins as soon as possible!

Busy busy

I've been busy all day today working on valentines presents for my family and F. I'll post pictures of them in the next post and talk about our Valentines traditions. And the exciting thing about this particular Valentines Day.

Until then, here is an old recipe that I love.

FLUFFY EGGLESS PANCAKES

From COOKS.COM

1 cup all-purpose flour
1 teaspoon sugar
1 teaspoon cinnamon
2 teaspoon baking powder
1 cup whole milk
1 tablespoon vegetable oil
1 tablespoon water
1 teaspoon vanilla extract
2 tablespoon butter

Combine dry ingredients and mix slightly. Add milk, oil, water, and vanilla. Whisk together until just combined. Be careful not to over mix - it should still be slightly lumpy. Set aside to rest for a few minutes.

Heat a large skillet over medium-high heat until hot. While pan is heating, add butter. As soon as the butter is melted, add melted butter to pancake batter.

Return pan to stove and stir butter into batter.

When pan is hot, with a measuring cup or ladle, pour 1/4 cup of batter into the skillet for each pancake.

Cook until bubbles form on the surface. Carefully flip pancakes with turner/spatula and cook until golden brown.

Note: This recipe also works well with whole wheat flour. Chopped fruit, nuts or chocolate chips can be added to batter before cooking for a unique treat.


I love this recipe because a) it's so easy, b) it can be made even if you don't have eggs, and c) they are more like European pancakes which means they should be spread with Nutella and enjoyed like a crepe!!

Tuesday, February 3, 2009

Anniversary pictures!!

Alright, so I said my outfit choices where between two dresses... SYKE! (does anyone say that anymore?) My final outfit was one I threw on right before leaving. Black tee and jeans. I didn't feel like I would have been as comfortable in a dress, and I really wanted F to wear his argyle sweater.

We ended up with five different poses. We were really happy with the five we choice, and I'm excited to give them to parents, grandparents etc. And I did something that's probably illegal, and scanned them so I can print out more copies if I want to.

Without further ado...

Check out that argyle!

Different side and background

Ok, so I didn't realize 3 of the 5 poses were over the shoulder poses

I got this one in a 8 by 10 for me... I really like this one

And the crowning glory. I got this one in a 8 by 10 for Evan because we both died laughing after seeing this one. This symbolizes our relationship, me punching and him laughing. It's love...

What do you guys think???

Monday, February 2, 2009

New dresses make me happy

I've been meaning to blog about the two new dresses that I have acquired in the last month. Now seems like a good time because I was trying to decide between them because, for our anniversary, F arranged for us to go and get our pictures taken. We did them for our 2 year and loved them, then we did them again for our 3 year and I HATED them so we didn't go for 4. But we decided that 5 was a good year to try again. We had our appointment today and already have our pictures back. We decided just to go to a studio in the mall for ease and quick photos. Hopefully when we find our photographer we will be able to have an engagement session.

So here were the contenders!

F and I went to Kohls and got him two sweaters to work with these dresses. One was a black sweater with grey and red argyle. I thought I would pair it with this sweater dress from Target.


Target

I swiped this dress from my mom's closet. I would have to say this is the only time I've ever seen a dress on a model and actually liked it better on myself. This dress is cute worn with leggings and without the long sleeve shirt underneath. And it's only $16.09 right now!

The second dress I got from Marshalls which is like TJ Maxx or Ross, has clothes from big stores that haven't sold and it was on sale for $12.00. It is a jersey type material. I don't have a picture of it and can't find the brand online, so I thought I would show examples:


(middle image is from Wagglepop, I can't find where the others are from)

Imagine the basic layout of the first image, combined with the front rouching of the middle dress, with the color of the last dress.

F got a black sweater with gray squares, on sale at Kohls for 9.99!

So which dress and sweater combo did we go with? I will upload them in the next post, you'll have to wait to see. I'm quite happy with how the pictures turned out. We had a lot of fun and the photographer told us we made her day (although it was only 11:00, so is that a compliment? haha)

For other pretties, I have a few adorable dresses I've found... most of which are on sale!

This one I found on Target.com, and it's on sale for only $12.49!!
Target

This one I also found on Target.com and it also is only 12.49! AND it comes in brown, black, and yellow! Go check it out, it has a really sexy back.

Target

This dress is 'on sale' at JCrew (Damn you JCrew and your beautiful, drool-worthy too rich for my blood dresses!). This one is SO cute!
This orange sherbet one is 129.99 (down from 250.00). I usually don't wear orange, or even really like it, but this is a major exception. This dress also comes in four other flavors, erm, colors.
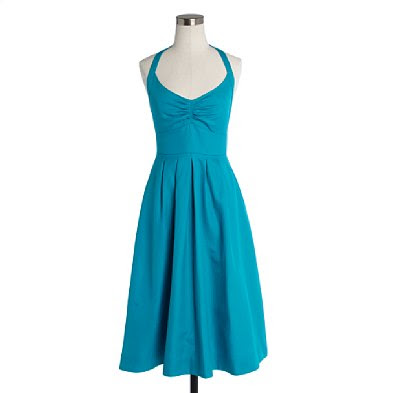
JCrew

I like this turqouise one too. This one is 89.00. I had to stop myself from save all the colors and putting them on here. Just promise me that you will go check them out. There is white, dark blue, and plum. I also really like the dark blue. And the plum. And the white could be used for a rehearsal dress, or even for the very fashion forward bride- a short wedding dress. So cute...

This one from Wet Seal is 32.99 and I love the lace of it!
Wet Seal

This dress is on Oldnavy.com and is a jersey dress that would be perfect for summer, and it's only $15.00 AND comes in 7 colors (6 solids and 1 print).
According to the website the dress comes in 'dark sea blue' (pictured above), 'cabot cove' (bright blue), 'kiwi kiss', 'bright coral', 'pink shag', 'black' and 'mixed floral' (white with tropical colored flowers).
Old Navy

I have to stop looking around, I'm itching for summer and summer clothes!

Next: Anniversary pictures are revealed!

Non-floral centerpieces

Did anyone else watch the Superbowl? I didn't realize how much I actually really like to watch football (the American kind) until I went to England and couldn't. I'm disappointed that the Steelers won, I'm still mad about the Superbowl they stole from Seattle a couple of years ago.

Anywho, to continue with the theme of centerpieces, here are some non-floral centerpieces (they may include live things, but I avoided ones that are blatantly flowers...)

I LOVE the color of this one! This would be easy, cheap, and quite summery.

Snippet and Ink

I don't necessarily like the lamp or the fake looking leaves around it, but I think the idea of having a vintage piece at the center of the table is a really neat idea. And it would be easy I think.
The Knot

This couple named all the tables after favorite authors and used quotes from their books. As an English Lit major, this appeals to me big time.
OffbeatBride

I actually like this better, using books and wrapping with a colorful ribbon. This couple used books from their own personal library, so there was almost no cost!
Offbeat Bride

This bride made these using wood from her own backyard and made paper flowers to go with. Rustic, yet charming.
Once Wed

Lots of green plants in cool vintage holders. I am especially love those Hen and Chick plants. Could you have an entire planter full of them?
A Lovely Morning

Grass as a centerpiece. Beautiful color, easy to grow yourself. Easy peasy.
Style Me Pretty

Love love love fruit as a centerpiece! Fruit is so beautiful and rich in color, and can be quite inexpensive! Plus, then you can give it away or use it and it's not going quite as much to waste.
Frolic

F actually really loved this idea, he loved the idea of planting and growing your own herbs. I think I would rather mix herbs in the buckets, just to give it more texture.
Snippet and Ink

To take it one step furhter, you can have a completely non-floral bouquet by ordering with Meghan who I found on Weddingbee Pro. I actually really love the look of the felt and the buttons (I just really love buttons), but I think I like the bouts better than the bouquets. Interesting though!
Princess Lasertron Weddingbeepro

Enjoy!